1.JWT,JWE 개념
JWT(JSON Web Token) 이란
JSON Web Token (JWT) 은 웹표준 (RFC 7519) 으로서
두 개체에서 JSON 객체를 사용하여 가볍고 자가수용적인 (self-contained) 방식으로
정보를 안전성 있게 전달해줍니다.
자가 수용적 (self-contained)
JWT 는 필요한 모든 정보를 자체적으로 지니고 있습니다. JWT 시스템에서 발급된 토큰은, 토큰에 대한 기본정보, 전달 할 정보 (로그인시스템에서는 유저 정보를 나타내겠죠?) 그리고 토큰이 검증됐다는것을 증명해주는 signature 를 포함하고있습니다.

JWT -> JWE(JSON Web Encryption)
2.권한서버에서 JWT 발급 + 리소스서버에서 JWT 검증
@Configuration
@EnableAuthorizationServer
public class AuthServerConfig
        extends AuthorizationServerConfigurerAdapter {

    @Value("${jwt.key}")
    private String jwtKey;

    @Autowired
    private AuthenticationManager authenticationManager;

    @Override
    public void configure(ClientDetailsServiceConfigurer clients) throws Exception {
        clients.inMemory()
                .withClient("client")
                .secret("secret")
                .authorizedGrantTypes("password", "refresh_token")
                .scopes("read");
}

    @Override
    public void configure(AuthorizationServerEndpointsConfigurer endpoints) {
        endpoints
          .authenticationManager(authenticationManager)
          .tokenStore(tokenStore())
          .accessTokenConverter(jwtAccessTokenConverter());
    }

    @Bean
    public TokenStore tokenStore() {
        return new JwtTokenStore(jwtAccessTokenConverter());
    }

    @Bean
    public JwtAccessTokenConverter jwtAccessTokenConverter() {
        var converter = new JwtAccessTokenConverter();
        converter.setSigningKey(jwtKey);
        return converter;
    }
}
JWT.KEY는 application.properties 파일에
jwt.key=ymLTU8rq83j4fmJZj60wh4OrMNuntIj4fmJ
기존에 했던 방식이라 설명은 하지 않음.
토큰이 발급되는 것을 확인

그후에 resourceserver를 9090포트로 띄어서

authorization header에 jwt를 넘겨주면 hello가 호출됨.
@Configuration
@EnableResourceServer
public class ResourceServerConfig extends ResourceServerConfigurerAdapter {

    @Value("${jwt.key}")
    private String jwtKey;

    @Override
    public void configure(ResourceServerSecurityConfigurer resources) {
        resources.tokenStore(tokenStore());
    }

    @Bean
    public TokenStore tokenStore() {
        return new JwtTokenStore(
                jwtAccessTokenConverter()
        );
    }

    @Bean
    public JwtAccessTokenConverter jwtAccessTokenConverter() {
        var converter = new JwtAccessTokenConverter();
        converter.setSigningKey(jwtKey);
        return converter;
    }
}
@Bean
public JwtAccessTokenConverter jwtAccessTokenConverter() {
var converter = new JwtAccessTokenConverter();
converter.setSigningKey(jwtKey);
return converter;
}
액세스 토큰 컨버터를 만들고 jwt를 검증하는 부분
3.비대칭키를 이용해 jwt 리소스서버,권한서버 구현방법
시작전에 비대칭키와 대칭키의 차이에 대해.
대칭키 VS 비대칭키(공개키)
대칭키 암호화 방식은 암복호화에 사용하는 키가 동일한 암호화 방식을 말한다.
비대칭키(공개키 암호화) 방식은 암복호화에 사용하는 키가 서로 다른 암호화 방식을 말한다. (비대칭키 암호화라고도 한다.)
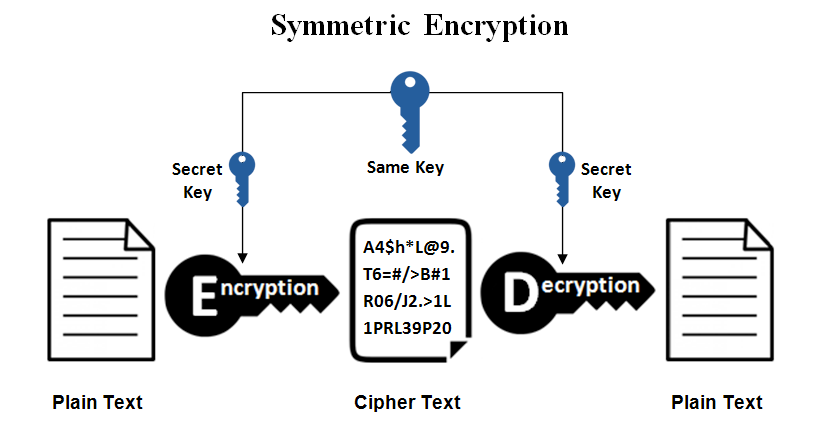
비대칭키

대칭키와 비대칭키의 가장 큰 차이는
@Bean
public JwtAccessTokenConverter jwtAccessTokenConverter() {
var converter = new JwtAccessTokenConverter();
converter.setVerifierKey(publicKey);
return converter;
}
컨버터 하는 부분의 차이입니다.
맨처음 했던 리소스서버의 토큰컨버터부분.
@Bean
public JwtAccessTokenConverter jwtAccessTokenConverter() {
    var converter = new JwtAccessTokenConverter();
    converter.setSigningKey(jwtKey);
    return converter;
}
비대칭키를 사용한 컨버터 부분
@Bean
public JwtAccessTokenConverter jwtAccessTokenConverter() {
    var converter = new JwtAccessTokenConverter();
    converter.setVerifierKey(publicKey);
    return converter;
}
그리고 authorization에서 tokenconver가 아래처럼 변경됨
@Bean
public JwtAccessTokenConverter jwtAccessTokenConverter() {
var converter = new JwtAccessTokenConverter();
KeyStoreKeyFactory keyStoreKeyFactory =
new KeyStoreKeyFactory(
new ClassPathResource(privateKey),
password.toCharArray());
converter.setKeyPair(keyStoreKeyFactory.getKeyPair(alias));
return converter;
}
기존 jwt access key에서 private key값으로 변경.
위와 같이 하고 맨처음 했던 방식과 동일하게 hello를 호출해도 동일한 결과값이 나옴.

4.공개키를 노출하는 권한부여서버
@Configuration
@EnableAuthorizationServer
public class AuthServerConfig
extends AuthorizationServerConfigurerAdapter {
@Value("${password}")
private String password;
@Value("${privateKey}")
private String privateKey;
@Value("${alias}")
private String alias;
@Autowired
private AuthenticationManager authenticationManager;
@Override
public void configure(ClientDetailsServiceConfigurer clients) throws Exception {
clients.inMemory()
.withClient("client")
.secret("secret")
.authorizedGrantTypes("password", "refresh_token")
.scopes("read")
.and()
.withClient("resourceserver")
.secret("resourceserversecret");
}
@Override
public void configure(AuthorizationServerEndpointsConfigurer endpoints) {
endpoints
.authenticationManager(authenticationManager)
.tokenStore(tokenStore())
.tokenEnhancer(jwtAccessTokenConverter());
}
@Bean
public TokenStore tokenStore() {
return new JwtTokenStore(jwtAccessTokenConverter());
}
@Bean
public JwtAccessTokenConverter jwtAccessTokenConverter() {
var converter = new JwtAccessTokenConverter();
KeyStoreKeyFactory keyStoreKeyFactory =
new KeyStoreKeyFactory(
new ClassPathResource(privateKey),
password.toCharArray());
converter.setKeyPair(keyStoreKeyFactory.getKeyPair(alias));
return converter;
}
@Override
public void configure(AuthorizationServerSecurityConfigurer security) {
security.tokenKeyAccess("isAuthenticated()");
}
}
차이점은 아래와 같다.
공개 키를 노출하는 엔드포인트를 호출할 때 리소스 서버가 이용하는
클라이언트 자격증명 추가
.and()
.withClient("resourceserver")
.secret("resourceserversecret");그후에 리소스서버의 application.properties 정보
server.port=9090
security.oauth2.resource.jwt.key-uri=http://localhost:8080/oauth/token_key
security.oauth2.client.client-id=resourceserver
security.oauth2.client.client-secret=resourceserversecret
public key 호출

퍼블릭키를 가져오는것을 확인.
그래서 퍼블릭키를 셋팅하는 부분이 리소스서버에서 모두 빠짐
기존.
@Configuration
@EnableResourceServer
public class ResourceServerConfig extends ResourceServerConfigurerAdapter {
@Value("${publicKey}")
private String publicKey;
@Override
public void configure(ResourceServerSecurityConfigurer resources) {
resources.tokenStore(tokenStore());
}
@Bean
public TokenStore tokenStore() {
return new JwtTokenStore(jwtAccessTokenConverter());
}
@Bean
public JwtAccessTokenConverter jwtAccessTokenConverter() {
    var converter = new JwtAccessTokenConverter();
    converter.setVerifierKey(publicKey);
    return converter;
}
}
변경
@Configuration
@EnableResourceServer
public class ResourceServerConfig extends ResourceServerConfigurerAdapter {
}
정리하면 순서가 아래와 같다.
권한부여서버 ------ 리소스서버
1.키값 이용해서 jwt 사용
2.비대칭키 public key 이용
3.리소스서버에서 public key 숨김
'IT' 카테고리의 다른 글
| 스프링시큐리티인액션 16장. 전역 메서드 보안 : 사전 및 사후 권한 부여 (1) | 2023.10.04 |
|---|---|
| 파이썬 series,dataframe (0) | 2023.09.20 |
| 파이썬 1158 (0) | 2023.09.13 |
| spring security in action chap.14 (0) | 2023.09.11 |
| 백준 1436 파이썬 (0) | 2023.09.08 |